
Oopitem koppel - Totale-duimgids
Totale-duimgids – Kies / Filter rekeninge
Om oopitem koppelings te redigeer:
1.Op die Aksie-duimgids, kies Oopitem koppel. Die Totale-duimgids sal by vestek vertoon word.
2.Kliek op die Filter knoppie om alle rekeninge wat as oopitem rekening gestel is, en waarteen transaksies in joernale en / of dokumente geposteer is, te lys.
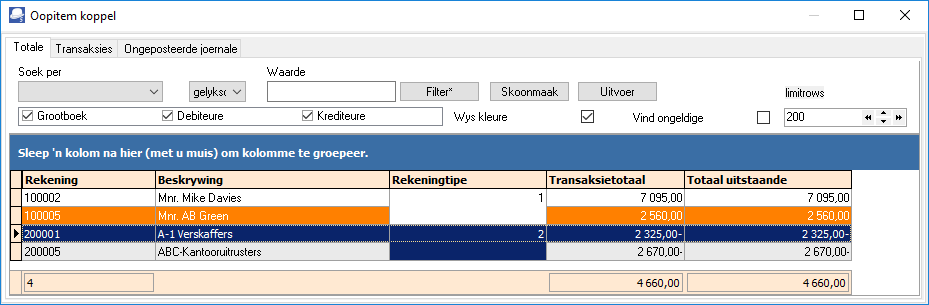
3.Indien rekeninge in wit of grys reëls vertoon word, bestaan daar nie uitstaande of ongekoppelde transaksies vir dié rekeninge nie.
|
|
Indien rekeninge in oranje reëls vertoon word, bestaan daar uitstaande of ongekoppelde transaksies vir dié rekeninge. Hierdie rekeninge in oranje reëls behoort aandag in die oopitem prosessering te kry. |

4.Filter opsies – U kan die Rekeningtipes kies (merk) om slegs dié spesifieke rekeningtipe (Grootboek, Debiteure of Krediteure) te lys.
|
|
Rekeningtipe 1 – Debiteurrekeninge - “Oopitem rekening” veld gekies (gemerk) in Debiteure - Rekeningkundige inligting-duimgids. 2 – Krediteurrekeninge - “Oopitem rekening” veld gekies (gemerk) in Krediteure - Rekeningkundige inligting-duimgids. 0 – Algemene grootboek - “Oopitem rekening” veld as Ja in Rekeninge gestel. 3 – Bankrekeninge - “Oopitem rekening” veld as Ja in Rekeninge gestel. 4 – BTW-rekeninge - “Oopitem rekening” veld as Ja in Rekeninge gestel. |
Filter options:
1.Search by - Select any of the column headings and an operator (e.g. Like (default), =, <, >, <=, =>, or <> ) and enter a value. Click on the Filter button. Only those transactions matching your specified values will be listed. To clear the values, click on the Clear button.
2.Account type - Select (tick) or deselect (remove the tick) to list the accounts for the selected account type(s) (Ledger, Debtors or Creditors).
3.Show colours - To be advised.
4.Find invalid - Select (tick) and click on the Filter button to list those accounts and transactions which have incorrect links .
5.limitrows - Limit rows - 200 rows is the default number of rows or transactions to be listed. The number of rows may be specified (decreased or increased).
6.Export - This button will create an Export.txt (Text files), which you may change the name and folder and save it. A Comma separated (CSV) file format is also available. Exported files can be used in a spreadsheet.
|
|
You may also drag columns to the "Use your mouse to pull a column here to group on that column" row. |
