
Create / Edit Accounts
To access the Edit accounts screen:
1.Click on the Edit → Accounts menu. The "Accounts" screen; listing your available accounts is displayed:
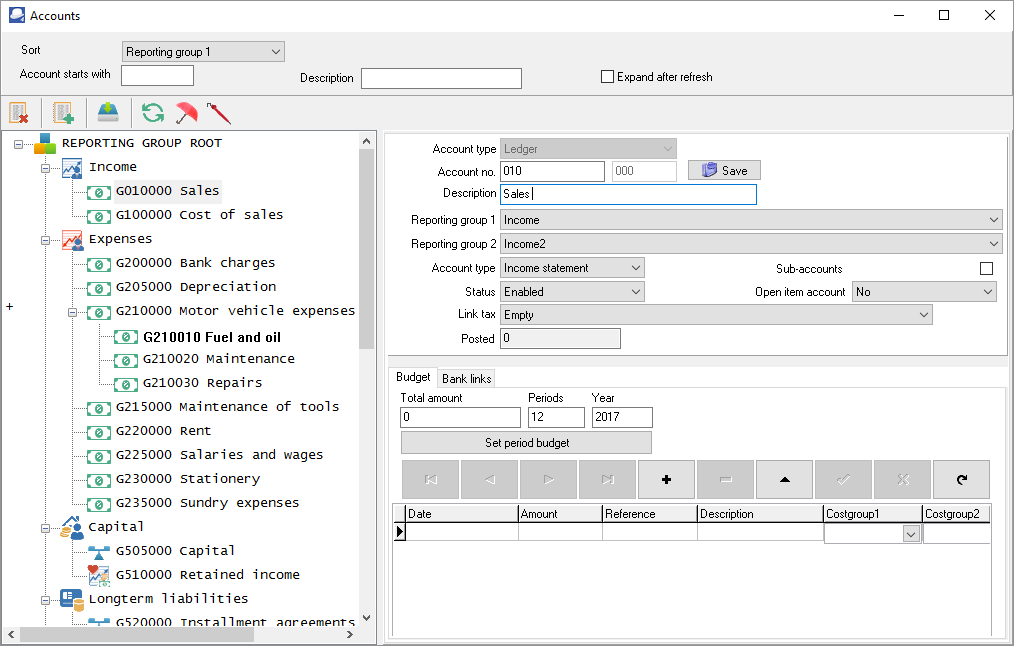
2.You may filter and search for Accounts and Account groups as follows:
|
Search / Filter option |
Description |
|
Sort: |
The default is None. - This will list all accounts according to the Account number (code). You may select to sort / list accounts according to Account reporting group 1 or Reporting group 2 or Financial categories. |
|
Account starts with: |
Filter your accounts by entering the first digit of the account number (code). For example entering 1 will list only those account numbers starting with 1 (e.g. 200 to 299). To filter the list further, you may, for example, enter 21 to list only those accounts from 210 to 219. |
|
Description: |
Enter any character in the Account name (description). Only those accounts containing that character will be listed (e.g. B will list all accounts containing the character b. By typing BANK in this field, only the Accounts containing bank in the account name (description) field will be listed. |
|
Expand after refresh: |
If this field is selected, the expanded list of accounts will be displayed (when clicking on the Refresh icon (or clicking on the Refresh item on the context-menu). |
The icons indicates the following:
|
Account groups |
Financial categories |
|
|
|

|
|
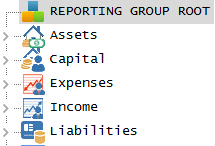
Account groups - Reporting group 1 and 2 – The sequence in which the groups and accounts are listed, may be changed in the Setup → System parameters → Groups menu. This is done by selecting the groups on the list and use the Move up or Move down buttons. |

|
Account group 1 |
Account group 2 |
|
|
|

Icons for accounts:
|
Icon |
Account type |
Reported on |
Description |
|
|
Income / Expense |
Income statement |
Income – Expenses = Net Profit / Loss |
|
|
Assets / Liability |
Balance sheet |
What you own = Assets What you owe to others = Liabilities |
|
|
Bank |
Balance sheet |
Current assets |
|
|
Tax |
Balance sheet |
Current liabilities (Output tax – Input tax) |
|
|
Retained earnings / Retained income |
Balance sheet |
Capital (Profit / Loss – Previous years) |
|
|
Debtors / Creditors control |
Balance sheet |
Debtor's control = Current assets Creditor's control = Current liabilities |


Processing Icons and context-menus:

|
Account groups |
Accounts |
|
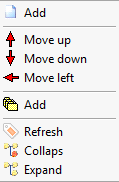
•Add Group. •Delete a selected Group Account / Sub-account. •Move selected Group up 1 entry •Move selected Group down 1 entry •Move selected Group to the left •Add new Account / Sub-account •Refresh the items on the Groups / Accounts list. •Collapse the expanded Groups / Accounts list. •Expand the short list of Accounts and Groups. |
|

|
|
The •Accounts which has any transactions processed (posted). The "Posted" field display a value of more than 0. •The •The |


|
Field |
Description |
|
Account type: |
Select the following options: 1.Ledger 2. 3. This field may only be selected for a new account. For existing accounts; this field will be disabled. |
|
Account no.: |
This consists of 2 parts. The first block is for the main account; and the second block for the sub-account. |
|
Description: |
The description for the account which will be used to lookup (select) accounts. This is also the description which will be displayed on reports. |
|
Group1: |
This is used to group and classify the accounts on reports. |
|
Group2: |
This is used to group and classify the accounts on reports. |
|
Account type: |
Balance sheet accounts - (i.e Capital, Liabilities and Assets) or Income statement accounts (i.e. Income or Expense). Balance sheet accounts retains the balances of the previous financial year (opening balances). Income statement accounts – these accounts are closed off during the Year-end process and the balance (Net Profit / Loss) is transferred to the Retained earnings / Retained income account. |
|
Sub-accounts: |
Select this option to create a main account. Once this option is selected, you first need to click on the Save button before you are allowed to create sub-accounts for that main account. You may then create sub-accounts for this main account. You will not be allowed to process (post) any transactions; or enter / edit any budget figures to the main account. All transactions and budget figures are entered on sub-accounts. The total of these individual sub-accounts will add up to the main account. To delete a main account, you first need to delete all sub-accounts. |
|
Status: |
By default, all accounts are enabled (active). Once you have any transactions processed (posted) on a main account, you may not delete the main account. You may then select the disabled option to block a selected account or sub-account. This will disable; or set the selected account's status to inactive). This will produce error messages to remind you that the account or sub-account is disabled, when trying to process (post) transactions to the disabled account or sub-account. |
|
Open item account: |
By default all accounts are set to “No”. If you select the “Yes” option, you may select to link (match) a receipt transaction to a debit transaction; or a payment transaction to a credit transaction, etc. This facility is useful when, for example, you need to control specific payments to specific transactions and specific receipts to specific transactions. |
|
Posted: |
This field indicates the number of transactions processed (posted) for the selected account. Once any transactions have been processed (posted) (the value is more than 0), you will not be allowed to delete the account. |
|
Link tax: |
Link a Tax account to a ledger account. This will then be the default tax account when selecting the ledger account when processing transactions in the payments journal, receipts journal or other journals (batches). |
|
|
Only the Account type, Account number, Description, Group 1 and Group 2 fields will be displayed for control accounts; i.e. |

|
|
The Save button will only be displayed (next to the "Description" (Account name) field), once any account is created or any field of an existing selected account is changed. You need to click on the Save button. If you do not do this, your changes will be lost. |
